What is a localhost printer?
Windows can print to a printer that is directly attached to the network. In some situations, we make Print Wizard act like it is a network printer; that is, a Print Wizard service emulates a printer's network interface, receiving print jobs and printing them. When the program generating the printout and the Print Wizard service are running on the same PC, we call this a "localhost" setup.
The term "localhost" has special meaning in the world of TCP/IP. Essentially, it means "this same machine".
When would I want to use a localhost setup?
You would use this approach when you want to have Print Wizard receive (or intercept) the output of a Windows printer driver on the same machine. Most Windows programs will print only by use of a Windows printer driver. In order to redirect that output to Print Wizard you would set up a localhost printer.
How does it work?
The program generating the data writes to the Windows printer interface, which writes to a particular printer driver. The port of that printer driver is set to "Standard TCP/IP" (either "raw" or "LPR" on a specific queue), and sends its output to a specified hostname or IP address. If that hostname is "localhost" or the IP address is "127.0.0.1", the network interface sends that to the same PC.
A Print Wizard service is running, monitoring a network port for incoming connections. For a "raw" connection, this is a listen service, typically monitoring port 9100. For an "LPR" connection, this is an LPD service, typically listening on port 515. The Print Wizard service accepts the connection, receives a print job, and passes it off to the Print Wizard "engine" for printing or processing. (The Print Wizard service could also receive jobs from other computers on the network.)
We generally suggest an LPR/LPD connection over a raw/listen connection, because the LPR/LPD protocol carries more information, such as the job name and user name.
The program generating the printout might drive the printer driver at a high level or a low level. Microsoft Word, for instance, outputs at a high level. It sets paper size, changes fonts, prints pictures, etc., using high-level calls to the Windows printing system. The particular printer driver in use translates these calls into some kind of a printer control language. This needs to be something that Print Wizard can understand, which usually means PCL-5.
Other programs, especially legacy programming languages such as COBOL or Pick Basic, simply send the printer driver a stream of bytes at a low level. This stream might be all plain text, or it might contain escape sequences. Print Wizard will receive exactly what the program sends out.
What Print Wizard does with its received data is discussed in other documentation.
How do I set it up?
There are two parts to setting this up. The first is adding a printer (actually installing a driver) . The second is setting up a Print Wizard service to watch for print jobs inbound.
We recommend using an HP PCL-5 printer driver for this. Just about any such driver will do, but if you want it to handle color, it should be a driver for a color printer. Our most tested driver is for an HP Color LaserJet c3505.
Setting up a “localhost” printer
This is done through the “Printers And Faxes” icon in the Control Panel or the Start menu for your Windows system. Open up this option up and follow the steps below.
a) Select "Add a printer"
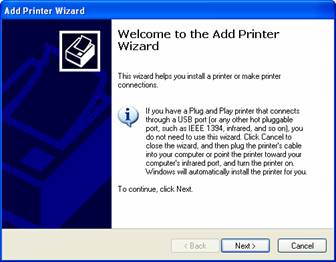
b) Click "Next"
c) Select "Local printer attached to this computer" and uncheck "Automatically detect...."
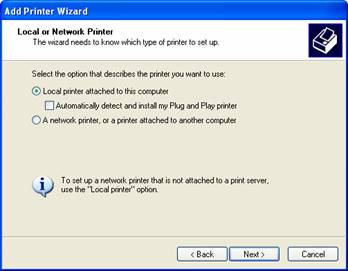
d) Click "Next"
e) In "Select a port", choose "Use the following port" and see if "localhost (Standard TCP/IP port)" is in the list. If so, use it. If not, choose "Create a new port" and select "Standard TCP/IP port".
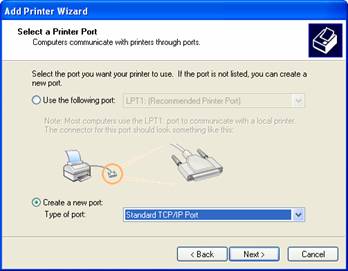
f) Click "Next"
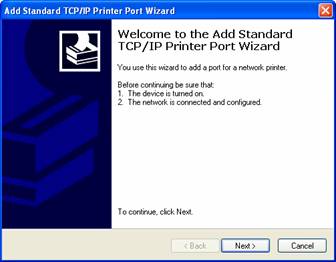
g) For "Printer Name or IP Address", enter "127.0.0.1" (port name should fill in automatically). Alternatively, you might enter "localhost". However, some systems with very tight security restrictions will not recognize or resolve the name "localhost".
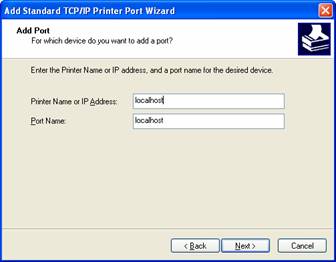
h) Click "Next". There will be a delay while the wizard probes for "localhost" information.
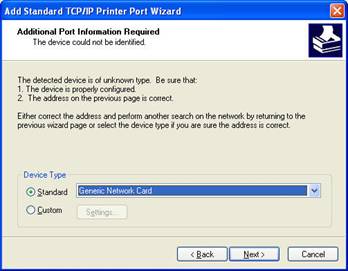
i) Additional port information needs to be set for "Custom" and then select "Settings".
j) Set Protocol to "Raw" or "LPR" as desired. We recommend "LPR" (see above). If you use "LPR", make up and remember a queue name such as "Q1".
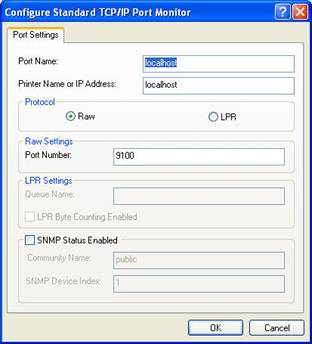
k) Click "OK".
l) Click "Next".
m) You should get the final status screen. Click "Finish".

n) This will return you to the select printer type screen.
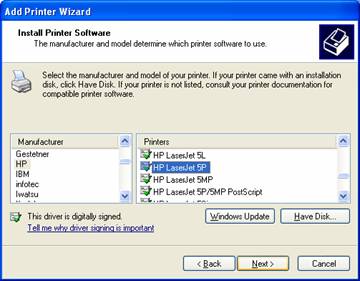
Select an appropriate printer driver, as discussed above.
o) Click “Next”.
p) Name your printer, but DO NOT make it your default printer, click “No”.
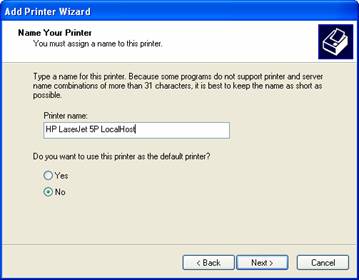
q) Click “Next”.
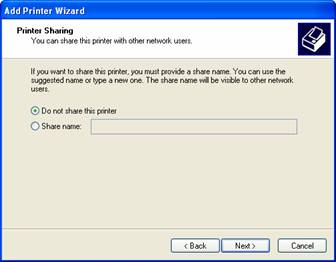
r) You do not need to make the printer shared as the Windows service for local TCP/IP printers will already have the printer shared. Simply click “Next”.
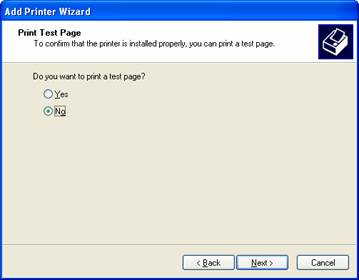
s) At the "Print TestPage" screen, select "No" and click "Next".
t) You will receive the final printer status page. Simply click “Finish”.
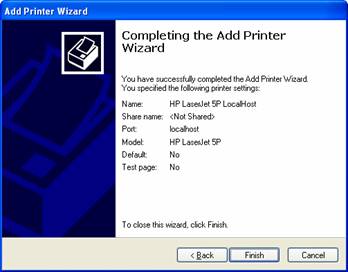
The printer should have been added to your list of printers.
Setting up Print Wizard
Now you need to configure a Print Wizard service to receive print jobs.
a) Start up PWUI, the Print Wizard User Interface.
b) When prompted for "all users", generally answer "Yes".
c) Go to the "Tools" menu, to "Setup Services".
d) Click "Add", make up a name for the service, and click "OK".
e) Under "Service type", select "Listen" or "LPD" as discussed above.
f) Place a checkmark in "Allow user interaction". This will better help you analyze what's going on.
g) Click the "Options" tab.
h) If you chose "Listen" as your service type, you will probably not change anything here. If you chose "LPD", add a queue name, the same as that used on the Windows side above (we used "Q1"). Make sure it is checkmarked.
i) If you chose "Listen", go to the "Printing" tab and select the printer you want Print Wizard to print on. If you chose "LPD" go to the properties of the queue, click the "Action to take" tab, and choose your destination printer. In either case do not choose the printer driver you installed in the steps above.
j) Click "OK" as necessary to get back to the "Print Wizard User Interface" screen.
k) Go to the Tools menu, then "Foreground service wizard". Select your service name, and step through until you get it to run. You should see the service flash on the screen, then move to the "notification tray" in the lower right.
What Might Go Wrong
You might get a message complaining about a firewall blocking the port. This will be a software firewall running in your Windows. Depending on what software that is, you may need to "open a port" (such as 515 for LPR/LPD, or 9100 for raw/listen) and/or enable a program (such as "pwlpd.exe" or "pwlisten.exe"). Or you might want to temporarily turn off your firewall.
Possible Next Steps
Once the Windows printer driver is installed, and the service is running, you can proceed with testing. Here are some ideas, in brief:
- Right-click on the icon in the tray, and select "Restore". This will bring the service back to the main screen, allowing you to see if it actually receives a print job.
- In PWUI, in the View menu, turn on Debug and Logging. this will give more information about what's happening inside the service's window, inside the engine's window, and in the log file. You can view the log file at any time by going to PWUI's View menu and selecting View Log.
- Do a test print from the Windows printer driver installed as above.
- Do a test print from the program you want to use Print Wizard with.
- If you want to alter what Print Wizard does with each print job, use PWUI to define a profile (a set of configuration settings). If using raw/listen, connect the service to the profile. If using LPR/LPD, connect the queue to the profile.
- When everything is working well, turn off Debug.
- For permanent background operation, run the service as a Windows service instead of a foreground service.
Conceptual Look at Print Wizard and Localhost Printing
The following diagram may help you understand the concepts behind localhost printing.
The important thing to remember is there are two printer drivers involved, as well as Print Wizard. The type and capabilities of the printer driver must be compatible to interact properly.
For additional information, refer to the Print Wizard documentation.
Last review and update: July 8, 2014